Showing posts with label Altered item. Show all posts

Monday, July 5, 2021

A Dinosaur Card


         We are having yet another heat wave! The temperatures started rising Saturday night and got higher every hour. Today, with the humidity, it felt like it was over 100F….and the heat wave will continue for a few more days…along with the usual thunderstorms that seem to go along with high humidity. We managed to get in 40km on the bikes last week but if we get rain and thunderstorms all week as predicted, we will not be going biking this week. We shall see.

         I decided I needed a few cards for young boys, toddler and up. I don’t have many stamps for that age group, so I went looking for some free digi stamps. I stumbled across some free dinosaur images that were perfect for young boys…. or girls….my granddaughter still loves dinosaurs, and she is 30!

         Here is the first card I made.


    The dinosaur images were printed on photo paper that came from the dollar store. These are greeting cards that will be tossed in the garbage so why print them on expensive photo paper. Then each image was hand cut and the edges inked in black. I do not like white edges. This was more time consuming than making the rest of the card but that’s okay. I just took my time and carefully cut them out. So, then it was, “What now?” I seldom have any idea of what the card is going to look like when I start. I just start pulling out bits and pieces of paper from my over-flowing stash. I found that large polka dot paper and decided it was great for a child’s card. It was glued to a white card base. Then I pulled out some bits of left-over paper that picked up the green polka dots. Two were die cut with a Spellbinder’s crinkled edge die but the striped one I just left plain. Those edges were inked with green ink. Everything was glued down and then I thought, “Ooops, I need a sentiment.” That little birthday stamp was the perfect size, and I said a little prayer that I didn’t mess up stamping it because everything was already glued down. Perfect. Whew! 

So I looked at it for a few minutes and decided it needed something along that left edge. A small strip of paper was sitting on my desk and it was very birthday looking paper with that tiny, shiny blue and green dots all over it. So it was glued down and then I die cut the large candle using a very old Cuttlebug die from blue paper to pick up the blue in the polka dots. The candle and flame die cut as one piece, but I like to cut them apart, round the tops down a bit and then a black line was drawn between them to be the wick. Stickles were added to the flame…..and I called it finished!

That’s all for a very hot and humid Monday on July 5, 2021.

Cheers

Violet

PS: To save a card to your Pinterest account, simply hover over the image until the ‘Pin It” symbol appears and then click…it sometimes takes a few seconds. This will take you to your own Pinterest account to save the card.


Wednesday, July 9, 2014

An Altered Item for Storing Dies


Although it was a delightfully cool evening and early morning by this afternoon it was back to an absolutely beautiful weather here in Ontario. Unfortunately I didn’t get much sleep last night so I was very tired today….too tired to be creative that’s for sure. I did have a plan in place for such a day though and it was actually very productive. Once I took the photos of my table I thought of the blog – www.stamping-ground.blogspot.com.au/2014/07/whats-on-your-workdesk-wednesday- so I think I’ll link this post to it.

Here is my table at noon.


Yup, I took all (most, I missed a few) of my small dies and either cut out the picture of what the die was or die cut a new image and glued the pictures right to the back of the die - Mod Podge was what I used. I got so tired of opening each package every time I wanted to use the die and the packages were taking up a lot of room. So, the plastic packages got tossed. Then after lunch I did the same thing to my large Sizzix dies. I have cut myself on those plastic containers too often so I was happy to get them done as well. And in case you are wondering, no it does not affect the cutting at all. I tried one first to make sure! The die in the middle with white paint smeared on it is the body and antennae of a Sizzix butterfly die. I die cut pieces in black and then Mod Podged them on and once they were dry I realized I couldn't see them - black on black does not show up. Told you I was tired! So I just rubbed some white paint over them so I can see what die it is.

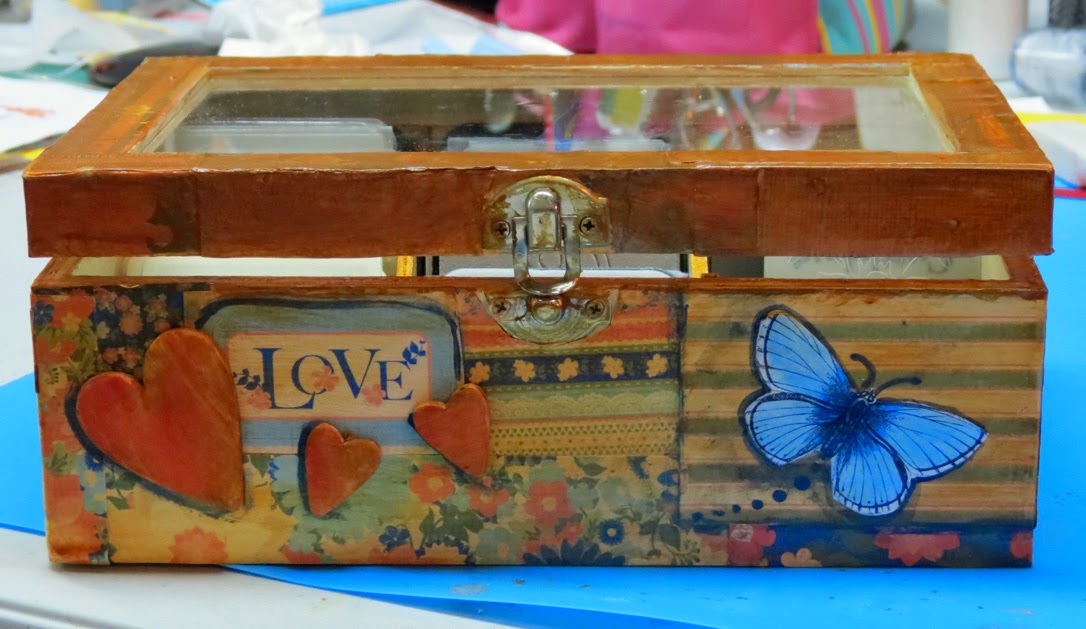
Once the large dies were dry I just put them back into the drawer and once again, they now take up much less room so I can actually flip them to find the one I want. The small dies went into a tea box container. I found this plain cheap wooden tea box at the dollar store and did a few(!!!) alterations to it to make it a little more artsy looking and here is a few shots of it.


So that was my Wednesday. What was on your desk today? I did manage to get outside to fill up the bird feeders. A hummingbird has decided to visit us again so that’s nice to see. He disappeared for a couple of weeks. Just before supper I wandered around the garden, pulled a few weeds and planted two small flowers I bought yesterday. All in all, not a bad day for someone tired!

Cheers
Violet


Monday, December 3, 2012

Before and After Candle Holder

Today is hubby's birthday. Bad news, good news x 2. Bad news - he's a year older, good news, he's pretty much over the flu. Second bad news, good news. I woke up with a lot of pressure in my head and very, very weird speech so hard to have a conversation with me. Good news, I sang happy birthday to him and it cracks him up every time. I should tape it some day. Some words I repeat over and over and the word birthday had about 20 syllables in it today. It's hilarious...and trust me people, I cannot sing normally. It was so funny today he asked me later on if I would sing to him again! That's a first! The only thing special he wanted for his birthday was a piece of cheesecake so yes, the vegetarian healthy eater bought a very small cheesecake for him. It's once a year so I guess we can work it off. He got his present early - tickets to see Michelle Wright live at the Capital Theatre.

Anyway, while he was sick over the weekend I had lots of time to play in the lower studio (aka the basement) and did some scrapbooking, card making, painting and finished up two mixed media pieces, one will be posted tomorrow, the other one later on. I also did some magic on a very scruffy blah looking candle holder that I picked up in a mixed bag of stuff at a garage sale years ago and never used it. Here is the before shot.

It's a little fuzzy but you can see that it is a large cube with stars cut out but very blah.

Here's the after.


This picture does not even come close to doing it justice either. It is beautiful. I simply sponged on 5 colours of red and wine alcohol inks and gold alcohol mixative. It is really shiny in real life and much brighter. I love it now! I will put a sealer on it so it doesn't get scratched and I'll likely use battery operated candles in it too. Not sure an open flame around alcohol ink is a good idea!

So, got something old? Don't toss it in the landfill. Give it a face lift!


Saturday, March 24, 2012

Quilted Photo Album Covers

Brrrrr. It's chilly here in Ontario again. After enjoying so many hot days in a row, today feels like fall again. They are even picking fresh asparagus here now. Every thing is at least about 3 weeks early. Hubby had to cut the grass yesterday and that was the first time he's had to cut it in March.

On with the post. Be honest now, how many of you have photo albums that are plain or just down right ugly? I had some. So, I decided to make quilted covers for them. I didn't take before pictures but here are the after ones.

The front cover.
The back cover.

The entire album.

So simple to do. Just sew strips of various colour and sizes together, added squares, rectangles, flowers, etc. on top. Quilt with fancy threads or couched yarn; add buttons, jewels, beads, etc. Make it larger then you need so you can trim it to size later. Fons and Porter had the instructions to make these in one of their magazines and I sort of followed it. I don't see it on their web site but if you Google in a search you will get dozens of sites to visit. They will tell you how to do the final construction but make the covers your own.

Here is another one done the same way but in fall colours.


As you can see, similar but different. The large flowers on this album, and the first one, were silk flowers that I pressed flat, added fusible web (likely Steam-a-Seam Lite) and fused them on, and then did some stitching. Another stash buster project.

This next one was done a little differently.


I had some small pieces of Christmas fabric but not enough to do a large project so I cut them into squares, with alternate green check squares, and sewed them together. It was not quite long enough so I added the red accent stripe and then the patterned fabric and quilted it. If you look closely you can see Christmas trees quilted on the green blocks. Super simple to do.  I gave these all away as gifts.


Sunday, October 30, 2011

From a Curtain to a Vest

That's right...first it was a curtain, and then it was a vest. We bought new curtains for the bedroom and they were way too long. After cutting them off and re-hemming them I had a large piece of fabric left over and I said to hubby "I cannot waste this fabric. I have to turn it into something". He just shook his head, rolled his eyes, and walked away - smart man! (Although I've noticed he does the head shaking and eye rolling quite a lot - my father used to do that too - must be just a man trait). Anyway, after thinking about it for awhile, I made a decision and took the plunge. Here's what that curtain remnant became:


Yup, I made a vest, fully lined, and painted it. The patterns are from various painting sources and I just used acrylic paint mixed with fabric medium....and of course, I added some glitter.

I hate to waste things...hate to throw stuff in the garbage that fills up the landfill...and I love to recycle "junk" into useful items. Try it yourself. It's so rewarding.

Tuesday, August 23, 2011

Earthquake in Ontario?? ...and storage dilemma

Wow, the talk around here is the earthquake that was felt in Southern Ontario that originated down in Virginia, U.S.A. Joe and I didn't feel it here at our house but my sister-in-law who lives across town felt it. She lives on the 4th floor and she said it actually moved her computer tower. Hopefully no one was hurt anywhere. This happening just after a F3 tornado touched down in Goderich, ON on Sunday which destroyed the heart of that town and caused one death is a bit too much.

However, life goes on and we must be grateful for every day here on earth - good or bad because it's better then the alternative. When people remark that I handle dealing with two rare brain disorders so well I always tell them "Every day this side of the dirt is a good one"!

++++++++++++++++++++++++++++++++++++++++++++++++++++++

Now on to the storage dilemma. Are any of you thrifters?..you know, those that wander thru thrift stores? I love to go. Never know what you are going to find. On Saturday I went over to Value Village and found a bag of stamps - one large background stamp, one new Making Memories 4 flower stamps and a new package of alphabet stamps and some other things - $4.99! and a brand new, hand made but well made bird house - $2.99 and some of those brand new satin/foam covered hangers...I think I picked up 6 for $3.99 or so. Oh, I'm drifting away from the topic...sorry.

So, I was wandering thru the thrift store one day and found one of those old storage containers that held the very large floppy disks from the 80's. I sort of wondered if it would hold DVD or CD cases so one of the young guys that work there went and got one and it fit fine. Bought it for $1.99 I think. It was pretty plain and marked up so I thought I'd pretty it up some. Phase 1 - covered it with alcohol inks. Here it is:

Better but still rather blah!

Next Phase - Flowers and birds. I cut out dozens of pictures of flowers and birds and glued them on with ModPodge. Here it is:
Better but rather bright now!

So on to Phase Three: I painted watered down brown paint all over it and wiped it off immediately. This toned down the bright colours and made a more pleasing effect. Here are a couple of close-ups of it.
There is just a subtle difference.

So I put all my Spellbinder dies into blank CD cases and put them in. Oh, oh they didn't all fit. It's not as big as I thought it was.
And I couldn't fit the dividers in that I had already labeled. And to make it worse....

.....it doesn't close. Well, most of them fit in but it's not really working for me without the dividers......another Virgo thing. So, any suggestions on how to store those Spellbinder dies? If so, please leave your suggestions on the comment section for others to view too.

Related Posts Plugin for WordPress, Blogger...