Showing posts with label Anniversary Card. Show all posts

Wednesday, January 15, 2025

50th Wedding Anniversary Card


Unfortunately, the snow did not miss us this time. So, we are having typical cold, snowy and windy January weather. Our neighbour on the north of us has been using his snow blower to clear our driveway for a few years now for a nominal fee, which is awesome. Yesterday, the neighbour on the south side of us decided to clear our driveway. It was nice of him but I had to explain that the other neighbour does it. He said he needed the exercise and wanted to thank us for being good neighbours. He’s a nice guy but a little hard to understand because he has a strong Jamaican accent. We are blessed to have such good neighbours. Until he bought the house, it was rented out to a variety of people, who were not good neighbours. But all is well with both of them.

I had a friend ask me to make her a 50th wedding anniversary card. I had the Big Bloom die set on my desk so I used it again.


 The background is shiny white paper and th flowers are a specialty white paper which is really nice in wedding cards as well as anniversary cards. I’m almost out of it though so I hope I can find more.

 The flowers and leaves are all gold and white and I used the same method of flipping them over and using a large stylus to mold the back and then flipped them over again and pushed down in the centre to really give them dimension. I die cut some hearts and tiny circles from the same gold paper. There are several shades of gold and they don’t always look nice together. The gold die circle was from another die but I have no idea where I got if from. That is one die and it cuts as shown. The centre is another piece of the same paper as the flowers but it looks different because its flat. I had to audition several circle dies to find one that fit perfectly behind the gold circles. The sentiment is a gold peel-off. It needed something on the bottom to anchor it all so I added a strip of gold. She loved it. Whew!

That is all for Wednesday, January 15, 2025

Cheers

Violet


Sunday, December 29, 2024

Experimental card


It’s almost the end of 2024 and time to reflect on the past and plan for the future. I’m more of a plan for the future person and I plan to stay healthy and be creative. We had a very green and wet Christmas here in Ontario. In fact, yesterday it was 54F here – very unusually high temperatures for the end of December. Today it has been raining all day but still mild. More rain for the next couple of days too. It’s better than snow. I stay inside and make cards or quilt.

Today’s card was made using paper from a 6”x 6” paper pad that I had no idea how to use in a card.  I was tired of storing it and decided to just experiment with it. Here is what I came up with.

The original piece had roughly the same pattern on the left as the right. So the first thing I did was to cut it down to the 4x5.25. But that left the left side completely blank. So I pulled out a seldom used lace border stamp and stamped it along the left side. Not bad actually. Then I took the piece that was cut off and die cut a tag from it. That was enough to bring the same colours to the left side. A gold peel-off sentiment was added to the tag along with a tied bow. Then some die cut butterflies were added. It was mounted on a bright turquoise blue card base which really made it pop. It turned out better than I thought it would.

That’s all for a very wet Sunday December 29, 2024.

Cheers

Violet


Friday, September 13, 2024

I'm Back...with 2 cards


I’m back! My neighbour finally found a way to remove One Drive completely, but it was not easy. Thank goodness we have a neighbour who we call our computer guru!

Here’s a quick update – August would be hot and humid with thunderstorms and would then switch to very cold for a few days and then back to hot and humid. So, basically same weird weather. We are enjoying very hot weather for September right now and the rest of the month will be the same, and no rain in the forecast at all. We could use a good, all-day rain.

I turned 77 on the labour day weekend and had a lovely birthday week. Two of my daughters and family members came the week before for a picnic and visit at Rondeau Provincial Park which was lovely. Joe and I then celebrated my birthday on our own. I got my daughter’s camping trailer quilt finished just in time to give it to her at the picnic. She loved it. Whew! Here’s a photo of her and I at the picnic. Double click to enlarge.


I did get a lot of cards made in the last few weeks. Here are two of them. I’m posting two as they are the same design with different elements.


I needed a couple of anniversary cards. I was in a “use up the scraps” mode and found these two green strips left over from other projects and decided to use them. I cut a piece of white cardstock 4” x 5.25” and glued the strips down the middle. Then gold peel-off strips were added along the edges. The sentiments are gold peel-offs as well. The butterflies were very plain, so I covered them with clear glitter. I had a whole package of butterflies, but they were just very blah looking so I sat one night and glittered them all. The butterfly body is from an old Memory Box die. Then some gold flower peel-offs were added.

On the other card I used this hand-cut bird from a package of ephemera bits and popped it up with dimensional foam. Small gold gems were added to the centres of the flowers in the strip of paper and a few by the sentiment.

That’s all for now. Take care all.

 Cheers

Violet

Ps: To save a card to your Pinterest account, simply over over the image until the “Pin It” symbol appears and then click …. be patient, it sometimes takes a few seconds. This will take you to your own Pinterest account to save the card.


Sunday, March 10, 2024

Anniversary Card

 What a week, weather wise. We had those two gorgeous days that felt like it was late May: then rain for a couple of days but not as much as they predicted, thank goodness; and then we woke up to snow on the ground today: and tonight there is a very strong cold wind blowing. I made lemon pie today and took a piece over to our neighbour who is a recent widower and barely cooks let alone bake and I thought I was going to get blown away. It was definitely a winter day today!

Because of the nasty weather this weekend, I hustled down to the lower studio (aka the basement) and made a few cards. A friend requested a anniversary card for her hubby. No problem. Here’s one I made for her consideration.


 While looking for something in one of my many stashes, I found this package of pre-cut, stamped images and matching paper. I remember picking this up at the thrift store along with other goodies and forgot all about them. Time to use them.

I traced the stamped image onto a piece of black cardstock and hand cut it and rounded the corners so it matched the one from the pack. The designer paper was cut down to 5.25 x 5 to fit on the black card base I made. I tried laying it on a white card base but it looked better on the black. I really like putting one piece of cardstock on a slight angle and then the focal piece on top.  I really liked the saying “I love us” so I rummaged through a pack of ephemera and found that two birds on the flowery branch. It had another long branch between the birds but it covered the saying so I carefully hand cut out just the parts I wanted and glued it down. I decided it didn’t need anything else.

That’s all for a very cold wintery day on March 10, 2024.

Cheers

Violet

Ps: To save a card to your Pinterest account, simply over over the image until the “Pin It” symbol appears and then click …. be patient, it sometimes takes a few seconds. This will take you to your own Pinterest account to save the card.


Wednesday, May 24, 2023

50th Wedding Anniversary Card

 There is a cold North wind blowing today so we are staying inside. Besides, we went to Erieau yesterday, which is a small village right along the shore of Lake Erie and walked a trail looking for birds. We did get to see some, and photographed some, but the leaves are out in full force so it is hard to see the birds. So, we are a bit tired today and taking it easy.

 On Saturday we had the pleasure of attending the 50th wedding anniversary party for one of my sons-in-law’s parents. This is the card I made for them. Lots of layers on this card.

 It does not photograph well because both the gold cardstock and white cardstock are so shiny. The card base is the textured gold. The other elements are all from an old Spellbinder’s die set. The first white layer was die cut but I would do it differently next time. I wanted this layer to be raised up so I used a double sided roll of tape on the back of the shiny white cardstock; and on a piece of white foam, back and front. It was thick. My Big Shot groaned when I ran it through - several times. It did die cut but I had to pick out all those little pieces with tweezers….groan. But it was what I wanted to it was glued to the gold card base.

Then I used another piece of the same gold to die cut that fancy frame - just one piece so no problem getting it to die cut. I wanted to stamp the sentiment but it had to be on white so I flipped the die over and outlined just the centre piece and hand cut it a bit smaller. Then the sentiment was inked in VersaMark ink and then the gold embossing powder was heat set. It needed something else so I added the five tiny pearls.

They liked it and thought it was beautiful so mission accomplished.

 That’s all for a cool Wednesday, May 24, 2023.

Cheers

Violet
Ps: To save a card to your Pinterest account, simply over over the image until the “Pin It” symbol appears and then click …. be patient, it sometimes takes a few seconds. This will take you to your own Pinterest account to save the card.


Friday, February 24, 2023

A Vintage Card

 Well we did get the freezing rain storm here but thankfully we did not lose power like a lot of folks did, and some still don’t have it on. It turned very mild yesterday and all the ice melted; today, it was freezing cold. For those of you who live in the deep south and have no idea what an ice storm is; here’s a couple photos of our neighbour’s tree covered in ice. Some people had an inch of ice on their windshield! Lots of branches and even trees down from the weight of the ice.


    I managed to have a little me-time this past week and went down to the lower studio (aka the basement) and made some cards. Here’s a vintage anniversary card I made featuring two of Tim Holtz’s paper dolls.


 I was looking at the T.H. paper dolls and found the bride; then the man that I decided looked like a groom, and I just had to make a card using them. I had no idea how to pull this off so I just started flicking through these ephemera booklets and found the old ticket stubs, the bible, flowers and envelope, plank and decided to make them work. The first thing I did was run a black pen around the outside edges of the man and bride. I just don’t like white edges showing. Then I sponged brown ink around the edges of all the other embellishments. This helps with the vintage look.

 Then I had to decide what to mount them all on. So, the background started out as white cardstock; sponged blue Distress inks around the entire thing, keeping the lighter blue to the middle. Water was splattered on to create some depth. Then Distress Oxide ink Vintage Photo was sponged around the outside edge. Both blue and brown inks were watered down and  splattered onto the finished background. A gold peel-off was added to the envelope for the sentiment.

After that it was just a matter of deciding where everything would go and gluing the down. This was a fun card to make. I enjoyed the entire process.

That’s all for a cold Friday, February 24, 2023. Have a safe and creative weekend everyone and if possible, do a random act of kindness.

 Cheers

Violet

Ps: To save a card to your Pinterest account, simply over over the image until the “Pin It” symbol appears and then click …. be patient, it sometimes takes a few seconds. This will take you to your own Pinterest account to save the card.


Friday, June 11, 2021

Love Birds

 We are still experiencing a heat wave here in Ontario - hot and humid. The most often expressed statement is: “It’s not the heat, it’s the humidity”. You hear people saying that most of the summer.

Today’s card is another repurposed one. I absolutely could not toss the original card in the recycle bin…..it needed to be given a new life.


The circle of birds is what was part of the original card. It was die cut with a Spellbinder’s die. I used the background from another card for the background for this card. Once the circle was glued on, scalloped silver peel-off lines were added, including one silver peel-off tiny flower. After I posted this, several other tiny flowers were added. The sentiment is also a peel-off. The ribbon came from yet another card and it just happened to match perfectly.

That’s all for a hot and humid Friday, June 11, 2021. Have a safe and creative weekend everyone and if possible, perform a random act of kindness.

Cheers

Violet

PS: To save a card to your Pinterest account, simply hover over the image until the ‘Pin It” symbol appears and then click…it sometimes take a few seconds. This will take you to your own Pinterest account to save the card.


Wednesday, June 5, 2019

Second 50th Wedding Anniversary Card


        Here is the second 50th wedding anniversary card I made and it is the one my friend who requested them chose.


         The bottom is a piece of that lovely shimmer paper that I bought especially for wedding cards. It was embossed in a very old embossing folder and then glued to a square 5 ½” card base. Then a piece of gold paper was die cut and glued on top. Then the vine leaves were die cut from gold and glued on behind the die cut circle which is also shimmer cardstock. The ‘50’ was die cut with an old set of Cuttlebug dies. Then the gold gems were glued to the centre of each flower.

        That’s all for a yet another rainy, thunderstormy day, June 5, 2019. We have had a very wet May and June with cool winds blowing as well so it hasn’t felt much like spring around here.

Cheers

Violet

PS: To save a card to your Pinterest account, simply hover over the image until the ‘Pin It” symbol appears and then click…it sometimes take a few seconds. This will take you to your own Pinterest account to save the card.


Tuesday, June 4, 2019

Golden Anniversary Card


        I’m back!...and with a card to share. Unfortunately it was my hubby that had…and has…some medical problems and he has been confined to bed rest for almost 6 weeks…although he is now walking with a walker around the house so that is progress. I haven’t had much time to do make cards or quilt but I do so when I have a little free time. Between looking after him….and he has been a wonderful patient…and doing all the cooking and cleaning, housework and laundry…the last three he did the majority of…there isn’t much leisure time left. However, one of my friends asked if I could make her a 50th wedding anniversary card which was just what I needed to get back to the lower studio…aka the basement! I made her two cards so she would have a choice. This is the one she did not pick.


        The top die and wavy banner were die cut from some subtle but shiny paper. Gold paper was glued to a 5 ½ square card and then the die cuts were glued on top of it. I placed the wavy banner in the Tim Holtz card positioner and stamped the sentiment using VersaMark and then gold embossing powder and heat set it. I still get a little heavy handed when stamping but trying not to! She liked this card but liked the verse in the other card better so she went with it. I’ll post it in a few days.

        I’ll be posting whenever I have something to post and the time to do so, so I do hope you will stop in once in awhile as well. In the meantime, if you are looking for inspiration for a specific type of card, just click on LABELS, and then click on the link of what you are looking for. That will bring up only posts with those cards.

        That’s all for a sunny (finally) Tuesday, June 4, 2019.

Cheers

Violet

PS: To save a card to your Pinterest account, simply hover over the image until the ‘Pin It” symbol appears and then click…it sometimes take a few seconds. This will take you to your own Pinterest account to save the card.


Monday, September 3, 2018

Hot, Hot, Hot and a Card


Summer’s over! This is Joe’s saddest day of the year because summer’s over. We both love the fall colours but hate that it also means that the cold wind and snow will soon follow. We are not fond of winter at all!

However, we are boiling hot in our house today because the A/C decided to quit over night! And, seeing it as a holiday today, we have to wait until tomorrow to call for service…..we refuse to pay the extra to have them come out on a holiday…. we can survive one night without A/C….I hope! Hopefully they will come tomorrow because its going to feel close to 100F for the next couple of days.

I celebrated my 71st birthday on Saturday! We had a great BBQ and 25.5 km bike ride and my best friend came along too which was very nice. A few months ago I designed some card fronts for a store and never spent the $$ they paid me. I was saving it for something special, not just to restock the stash as it runs out. Well, I finally spent it! I bought myself the Tim Holtz mixed media platform. I decided this would be my birthday present from me to me as well as the dollars from the sale of my designs…..I got a very good deal on it and I had enough except for $2.10…cheap birthday present! I love it!

Today’s card is the second one I made following this challenge:  


 Once again, I’m using up the stash so I have no idea where that paper came from. The flower, stem and leaf were die cuts – Memory Box die I believe. I didn’t realize when I bought it that it cut each petal out separately. I have learned to add double sided tape behind it and to leave them petals in the die until ready to transplant them to the card….get it....transplant them…it’s a gardening joke… okay, I guess not that funny but its hot in here and I think my brain is fried. I added a yellow gem to the centre.

        Anyway, I followed the sketch….see previous post… and added a ribbon across the card and two circles with little die cut hearts in the middle. The sentiment is a peel-off that started out silver. I ran a yellow alcohol marker over it to make it less golden because silver just didn’t look right and the gold was too gold.

        That’s all for a hot and humid Monday, September 3, 2018.

        Cheers

Violet

PS: To save a card to your Pinterest account, simply hover over the image until the ‘Pin It” symbol appears and then click…it sometimes take a few seconds. This will take you to your own Pinterest account to save the card.


Friday, August 24, 2018

Anniversary Card for an Older Couple


We’ve managed to be comfortable with the A/C off for the last few days but this is likely the last day – its going to feel like its in the high 90’s all weekend – and more thunderstorms as well. We have our three youngest grandchildren this weekend too – darn weather has spoiled all our original plans but the boys are easy to please so that’s good.

Today I’m posting the second anniversary card I made using the sketch from Crazy for Challenges. Here’s the sketch.


And here’s my card. This one is for an older couple.


This time I actually made a single layer card – another thing I seldom do. The die cut stitched oval is from an Elizabeth Craft set. The stamped image is an old Stamping Bella one that was coloured with pencils and blended with gamsol. It didn’t come with a matching die…. and I seldom buy them anyway…. so I just hand cut it. The border is a Martha Stewart punch. The flowers are just random flowers in my flower stash so I have no idea where they came from. The sentiment is a silver peel-off.

That’s all for a lovely Friday, August 24, 2018. Have a wonderful and safe weekend everyone. I’ll be back on Monday with another card to post.

Cheers

Violet

PS: To save a card to your Pinterest account, simply hover over the image until the ‘Pin It” symbol appears and then click…it sometimes take a few seconds. This will take you to your own Pinterest account to save the card.


Wednesday, August 22, 2018

A Card Challenge


        It was another busy day today. For some odd reason the temperatures plummeted over night and it was actually quite cool today….at least the wind was. However, more hot and humid weather along with thunderstorms are fast approaching!

        Today’s card is for a card challenge on hhtps://crazy4challenges.blogspot.com. I was checking out some sites I have on my favourite list and decided to follow their challenge – which meant I had to follow a sketch! Yes, I, who seldom ever follows a sketch or even thinks ahead of time what to create, had to follow a sketch. And I liked it so much I made two cards last night. Here’s the first one I made using this sketch.


Here’s my version of it.


        I needed a couple of anniversary cards so that’s what I decided on. I had some dark yellow cardstock cut down to the standard card size with some left over bits on the desk so I made a yellow card. I pulled out that designer paper to add a little background interest and cut it down 1/8” smaller all around than the card. The heart sentiment came from a stamp set I won months and months ago. I stamped it on white cardstock and then cut around it. Then I laid it, upside down, on a piece of the same yellow as the card base and traced around it and then cut it out leaving less than ¼” edge and glued them together.

The band across the middle of the card is from a Martha Stewart punch….I just found a windfall at the thrift store of someone who obviously gave up crafting and I am now the proud owner of several new punches and other goodies (it was the most expensive 3 boxes of crafting supplies I have ever bought at the thrift store but worth it). Anyway, I glued the band on and then the heart. The daisies and butterfly are from K and Co. – a dollar store find. Yes, I’m just a bit thrifty and I love a bargain. If it’s not on sale, at the dollar store or thrift store, I probably won’t buy it unless I’m desperate for it.

        Anyway, once everything was glued down I added the sentiment. This was a silver peel-off sentiment and I ran a yellow BIC marker over it to give it a light golden yellow tinge. The gold peel-off sentiment was too bright. Then it was glued to the card base. I liked it so much I made another one – totally different but same sketch – stay tuned for that one.

        That’s all for a cool Wednesday, August-22-18.

Cheers

Violet

PS: To save a card to your Pinterest account, simply hover over the image until the ‘Pin It” symbol appears and then click…it sometimes take a few seconds. This will take you to your own Pinterest account to save the card.


Monday, January 2, 2017

First Card for 2017


We are having quite the balmy weather here in Southern Ontario. I just walked downtown and back without a hat or gloves on and I even had to open my coat a bit as I was getting too warm. Love it!


I forgot to post about my surprise on the afternoon of Christmas Eve so I’m doing it now. (Today’s card will follow). There was a knock on the door late in the afternoon of December 24th, and there was my neighbour and her two sons with a lovely bamboo plant in a very pretty container for me. I have no idea what I did to deserve it but it was lovely of them. We are blessed with some very nice neighbours. Here’s a picture of me with the bamboo.


Today’s card was made with a Penny Black stamp and my home-made Misti. (Just do a YouTube video to find out how to make one).


I placed some water colour paper on to the Misti and then placed the stamp where I wanted it and closed the lid to pick up the stamp. Then I started to colour the stamp with Tombow markers; colouring and stamping over and over until I got the look I wanted. I’ve used this stamp without the Misti and never liked the results as much as this one. Once it was dry I splattered some blue and orange water colour paint over it. Once that was dry I added some clear Wink of Stella on the birds to give them some shimmer. The finished piece was then glued to a royal blue piece of cardstock and then on to the dark blue card base. Another strip of water colour paper was sponged and splattered with the same colours as the focal image and then a royal blue strip was glued one top; and then the peel-off sentiment was added.


Now that I’ve mastered my home-made Misti I’ll pull out some of my other Penny Black Slap Stick stamps and put them to use. I would still like a real Misti but one is not in my budget so my home-made one will have to do.


Don’t forget you are more than welcome to save any cards to your Pinterest account for future reference. Simply place the curser over the picture until the Pinterest save sign shows up in the top left corner and enter. This will take you to your Pinterest account. If it doesn’t work, please leave a comment and let me know. Thanks.


That’s all for a mild January, 2, 2017


Cheers

Violet


Tuesday, August 9, 2016

A Wine Card from the Stash


The hot and humid weather is creeping back up. I have no interest in being outside in that humidity so it was into the sewing room for me and I finished another quilt today. I just had to put the binding on and now on to the next quilt!


I like to quilt during the day and make cards or do scrapbooking at night. Here’s a card that I made last week.


As I was finishing up another card I found this pretty piece of wine cardstock and decided right then and there to use it in a card instead of filing it back into the stash. The top of the card is a very light yellowish-green colour which is the complementary colour for wine. Before taping them together though I ran the wine cardstock through an embossing folder. The embossed flowers and leaves did not show up that well so I took a white ink pad and just very gently went over the top of them to just catch the embossed areas and not the rest of it. Now it pops!


 I liked the top paper but I wanted to bring some wine colour into it so I used an old retired Stampin’ Up stamp of tiny hearts and dots and stamped them around the piece. A gold peel-off line covers the seam where I joined the two pieces; and gold peel-offs were used for the sentiment and fancy scroll under the sentiment.


It needed something else. Butterflies are always nice so I found some more wine cardstock and die cut the butterflies with Memory Box dies. I left one open but the one on the right has a solid butterfly underneath with the lacy one on top…..I just like things to be different! When I laid the card top on the card base I didn’t like the white edge….too stark. So, an easy solution was to simply sponge a light bit of wine ink around the edge and then stamp a few more hearts and dots.

I know most card makers start out with a sketch or definite plan but I just like to wing it and create as I go. Don’t forget you are more than welcome to save any cards to your Pinterest account for future reference. Simply place the curser over the picture until the Pinterest sign shows up and enter. This will take you to your Pinterest account.


That’s all for a hot and humid Tuesday,


Cheers

Violet


Thursday, May 12, 2016

It Was One-Of-Those-Days...and a Card

There is a card posted at the end of this long post. If you don’t want a good laugh, just ignore the story and pop down to the end.

Well yesterday was just “one of those days”! Joe slipped a bit getting out of the shower and wrenched his back the night before. He was a bit stiff and sore but we attempted to go birding late in the morning anyway – it started to rain about 25 minutes after we arrived – but it was close to lunch time so we headed to the visitor’s centre for lunch…..too late….the tables were filled with birders who most likely started out a few hours before us (a lot of birders camp at the park) so they were hungrier earlier and ate up all the good soup. There was some vegetable soup left and I had some a few days ago when it was on the menu and it was good but it is not very filling so we opted for a bagel and cream cheese for me and a large chocolate muffin (okay, more like a giant cupcake) for Joe. The rain stopped and we headed back out – not many birds but we did see the elusive and rare-in-Ontario Prothonotary Warbler – this guy - 


 The Prothonotary Warblers do come to Ontario each year but not many of them. There are at least two pair at Rondeau and two at Point Pelee and a few others scattered throughout. It is the most sought after bird and the photographers with the huge commercial lenses will sit for 8 hours or more in one spot to get a photo of it. We give a half and hour and if he does show up we leave. We got lucky yesterday!

and even the hyper Yellow Warbler sat still for a photo – this guy –

 
We wandered around for another hour and saw next to nothing and headed for home. So far it’s been a very disappointing bird watching season.

On the way home he decided to stop and pick up our bicycles that were in the shop for the annual check up. Why, we don’t bike until after birding is over and it was almost 5:00 and we were hungry? Who knows why….it’s a guy thing! Got the bikes and bought a brand new bike carrier that holds the bikes more securely so the bikes don’t flop around. Got home and couldn’t seem to release the bars that held the bikes on…drove back to the shop……it was a “can’t believe we missed that and are we ever dumb” problem. Then we realized that we don’t have the right tool at home to remove the bolt that holds the carrier on. Stopped on the way home at the hardware store to get a socket wrench to remove the carrier. Got home and destroyed the package getting it out….those packages are horrible to cut through….there was no extension on the tool and it hit the frame of the carrier….ooops, back to the hardware store for a refund and get something else…..apologized about the destroyed package…..she said it was okay but her body language said…grrrrrr…..anyway, got home and finally got the bikes off the car and the carrier removed…..and he decided to cut the back grass. Are you kidding me? You’re on your own buddy, I’m eating! Then I remembered that I was supposed to go check and water my sister’s plants as she is away for a few days. By the time I got back; made a quick sandwich; and he was done cutting the grass; showered and ate; and dishes got done; and I got showered I was too exhausted to do anything but flop down and read! What a day!

Another thunderstorm was predicted for this afternoon but so far (6:32 pm) no sign of it. Joe got the front lawn cut this morning and I made great headway getting my son-in-law’s quilt quilted. Tomorrow we may try birding again….may try… but right now it depends on his back and the weather.

And now for the third proposed anniversary card.
 
I decided to try something very different. I’m not how well received it will be but hopefully someone will like it. First the flowers and sentiment were stamped and embossed with white embossing powder. Then various pink and red inks were sponged over it. I started out with Distress Inks, Spun Sugar and then Warm Lipstick and finished off with Stampin’ Up Raspberry Ripple…..going back and forth between the three blending them together until I liked the end result. The embossed areas do resist the ink but I still rub a soft cloth (a piece of one of my old T-shirts) over the top to remove any ink sitting on top. Then I added tiny pearls to the centre of the flowers and then some soft pink sequins. Then it was glued to a standard white card base.

And that’s the end of this very long post on Thursday, May 12, 2016.

Cheers

Violet


Monday, May 9, 2016

A Black and White Card


In spite of the fact that it is a sunny day today, the wind is still very cool so it’s still not sitting outside on the porch weather yet...in fact, a light jacket was required. Today was grocery day instead of bird watching day…..we both decided we like to eat more than look at birds…..and besides, we were tired. Avid bird watchers we are not! The real avid watchers get to the parks at 6:00 in the morning to watch the warblers arrive after flying all night. We are not early morning people. Our beds are too comfortable and we are not motivated enough to get up at 4:00 in the morning to drive for an hour to see birds. We’re just happy to see a few in the afternoon and it gives us a nice long walk.

A friend of mine asked if I would make an anniversary card for someone married six years and of course I said yes. This is the first one I made….so far I’ve made three to give her some choices.


I decided to go for the black and white with a touch of silver for this card. The paper is from a 6” paper pack and I just cut two of them apart and then taped them together at the back and added the ribbon along the seam. The butterfly swag is a Memory Box die and it was die cut first in white and then the top one was die cut in black, along with the bodies. When I placed the white filigree butterfly on the top piece it sort of disappeared into the background so that’s when the black was die cut. It looked okay but of course I had the white filigree one sitting there and I placed it on top and with the black underneath, it really popped. Just the middle of each butterfly is glued down so the wings are free. The sentiment is a peel-off.

The next card will be the next post.

That’s all for a Monday, May-09-16

Cheers

Violet


Friday, March 4, 2016

A New Stamp!!!


This has been such a busy week what with both my sister and sister-in-law moving and/or getting ready to move and yet I told Joe that “I feel like I haven’t accomplished anything!” He just laughed and said that’s because you haven’t done any quilting or scrapbooking this week! True. I did make some cards but not much of anything else except help both of them with the trials of moving. My sister just finished her radiation for breast cancer about 10 days ago so she has not yet done major packing but we’ll get to that next week. She has lots of time yet before she has to be out of her place. We went to her new apartment this afternoon and spent a couple of hours putting down those thin sticky backed floor tiles on all the cupboards shelves and drawers. It is a bit of work but now the shelves look nicer and will be easier to clean. We didn’t get them all done but the rest will get done before she moves in.

Today’s card is the first one I made with my new Penny Black cling mount stamp. I love this stamp. I kept seeing it on various blogs and on YouTube and I just had to have it….and it wasn’t even on sale!


This was the first stamping of it and as I looked at it I thought this is going to be hard to stamp for a smaller card. This card base is 5 ½” so it’s a big stamp…..but then I noticed that flower on the far right was completely separate from the others. Mmmmhhhh do I cut it off or not. Off won. Yes, I cut up my stamps if they have something on it I don’t like or to make them more functional. Next week I’ll post a couple of cards with that cut off flower placed elsewhere on the card and left off all together. What about you….do you alter your stamps?

 Anyway, this was stamped on water colour paper with Archival ink and I used water colour pencils to paint the flowers in. I used actual water colour paint to do the sky and to splatter on the paint in the background. Now when you paint on water colour paper you are suppose to tape it down so it doesn’t buckle and bend. Do I ever remember to do that – NO, of course not but I have found a solution. If you ever have paper that is bent and only has paint or ink on it, iron it flat! Just place it between two pieces of plain paper to protect your iron and iron it with a hot dry iron. Works every time......but don't try this if it has glue, glitter or other bling on it.

Once it was ironed flat, some Stickles were added to the flowers and some sequins glued to the sky to add some bling. I was a little worried about just using glue to attach it to the darker pink layer so I made sure it stayed put by adding the heart brads after it was glued down. Before gluing it to the pink covered card base I added the ribbon and bow.
 
I really like this card and this stamp and I have no buyers remorse what so ever! It could be used for almost any occasion - ladies birthday card; anniversary card; get well card; or thinking of you card.
 
That’s all for a Friday, March-04-16

Have a great weekend everyone.

Cheers

Violet


Thursday, October 22, 2015

An Anniversary Card

What a lovely day it was here in Ontario! It gets quite cold at night but during the day it’s just lovely. Not much to report today so I’ll get right to the card. This is another “use up those old paper packs” card.

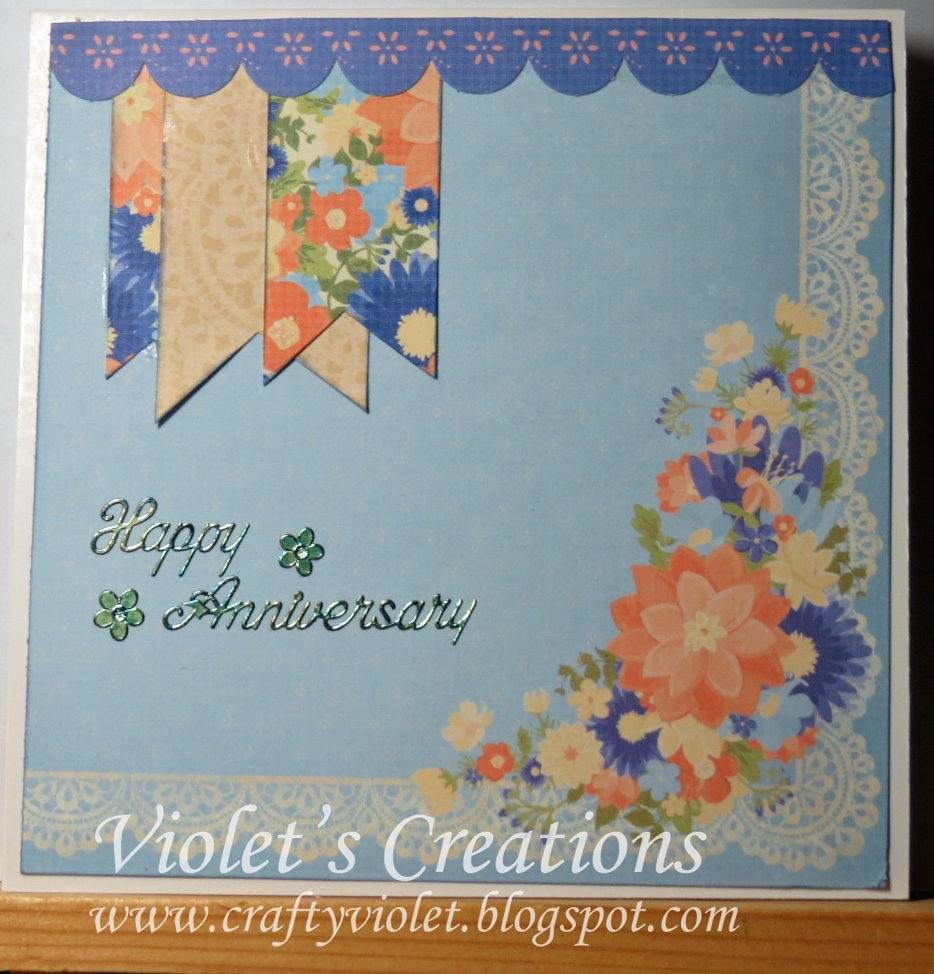
The corner treatment was only printed on one side so I simply trimmed off some of the left side so it would fit on a 5 ½” card base with just a bit of the white showing. There were some papers with a variety of the flowers printed on it so I took it and cut a couple of banners plus one beige one, also from the same pack. The blue trim across the top was also included in the back and it fit perfectly. The sentiment started out as a silver peel-off but I didn’t want to leave it silver so once again I pounced blue alcohol ink on it to change it to that lovely blue colour. A quick and easy card but I liked how it turned out.

That’s all for a lovely Thursday,

Cheers

Violet


Thursday, October 8, 2015

One New Die, Two Cards


What a busy day this has been. It was a beautiful morning so we had our usual morning walk. Then this afternoon I went down to help make quilts for the veterans through the Quilts of Valour program. If you know a Canadian veteran or active military personnel who has been injured, they will qualify to receive a quilt. Check it all out here:  http://www.quiltsofvalour.ca.

Today’s cards were made using one of my new Spellbinders die.
Card one
 
Card Two
The card bases were made by cutting an 8 ½” x 11” piece of cardstock in half. The white rectangle with the cut-out parts is one die. The next layer is the middle part which fits perfectly inside the first layer. For the first card a matching pen was run around the edge of the edge of the die while the white cardstock was still in the die which left that lovely extra detail. Unfortunately the pen ran out of ink so I couldn’t use it for the second card. I really like that extra edging so I think I’ll be investing in a few coloured pens now. The second layer is the coloured weave at the top and bottom with the white space in between. Of course it cuts out as one white piece and I decided it looked blah so I laid a piece of scrap paper at the edge of the weave and pounced on some VersaMark ink and then that lovely teal ink and added clear embossing powder and heat set it. Loved the look! On the second card I ran the teal ink all around the edge of the die cut piece. The piece was attached with thin dimensional glue dots to lift it off the main piece. Card one I stamped the sentiment right on the label part. Then a piece of white cardstock was run though a very old Spellbinder die to get that floral swish and once it was embossed I ran teal chalk over the embossed areas. It was attached with more dimensional glue dots. For the second card I cut and embossed the long label that comes with this die and stamped the sentiment on it. It too was added with dimensional glue dots. Then I added the bow and pearl.

That’s all for a lovely, busy Thursday,

Cheers

Violet

 
Related Posts Plugin for WordPress, Blogger...